In my last tutorial, I showed you how to create a simple tax calculator with a GUI using WPF. In this tutorial, we are going to take some of what you learned in that tutorial and add to it when I will show you how to create a tile flooring calculator in C# using WPF. By the end of this tutorial, you will be able to create secondary windows and display them to the user.
Requirements
Difficulty: Easy
Concepts Used:
- Variables
- Operators and Expressions
- Working with Strings
- Basics of Classes
- XAML
- Data Binding
- Multiple Windows
We want to create a GUI application that can calculate the total cost of putting in tile flooring for a given area. We want to be able to add more than one room to the calculations, and we want to factor in labor in these costs. We will display this data to the user.
Let’s Get Started
To get started, we need to create an empty C# WPF application in Visual Studio. For more information on how to do this click here.
The User Interface (UI)
Now that we have our new blank WPF application, we are ready to get started. First, in the MainWindow.xaml file set the Title equal to “Tile Flooring Calculator” so that our application will have a more interesting window title. Then set the Height to “350” and the Width to “600”.
The Grid Layout
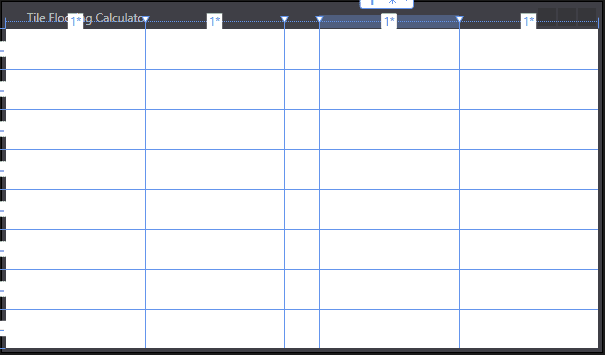
While still in the MainWindow.xaml file we want to create a grid layout with 5 columns and 8 rows. We want the 3rd column to be one-fourth of the rest of the columns. To do this, insert the following code inside the grid element.
<Grid.ColumnDefinitions >
   <ColumnDefinition Width="*" />
   <ColumnDefinition Width="*" />
   <ColumnDefinition Width=".25*" />
   <ColumnDefinition Width="*" />
   <ColumnDefinition Width="*" />
</Grid.ColumnDefinitions>

<Grid.RowDefinitions>
   <RowDefinition Height="*" />
   <RowDefinition Height="*" />
   <RowDefinition Height="*" />
   <RowDefinition Height="*" />
   <RowDefinition Height="*" />
   <RowDefinition Height="*" />
   <RowDefinition Height="*" />
   <RowDefinition Height="*" />
</Grid.RowDefinitions>
The above code will add the rows and columns to the Main Window which should look like the image below. Notice how the application window is split down the middle with a narrow column.
The Left Side
Now that we have the grid layout the way we want, it’s time to start adding the elements to the grid. We will start with the left side of the window and then work our way to the right side.
The first element we are going to add to the left side of the window is a button that will span across 2 columns. It will have a name of “AddNewButton,” a margin of “5”, and its content will be “Add New Room” The following code will do this.
<Button Name="AddNewRoomButton" Content="Add New Room" Grid.ColumnSpan="2" Margin="5" />
Next, we are going to add a listbox to hold all the rooms we add. The listbox will span across 2 columns and 6 rows. We want it to have a margin of 5. The listbox must have HorizontalContentAlignment set equal to “Stretch” for the content to fill the entire space.
Inside the listbox, we want an item template that will set how the content of the listbox should look. Inside the item template, we want a data template with a grid that gives it 2 columns. The first column twice as big as the second. The first column will have a text block to hold the Room title in a bold font and the second column will have a text block to hold the square footage of the rooms. The second column will have its content aligned to the right.
Whew, that was a lot to take in. I promise it’s not as complicated as it sounds. Let’s see what this listbox should look like in the code.
<ListBox Name="RoomsListBox" Grid.Row="1" Grid.ColumnSpan="2" Grid.RowSpan="6" Margin="5"  HorizontalContentAlignment="Stretch">
   <ListBox.ItemTemplate>
       <DataTemplate>
           <Grid>
               <Grid.ColumnDefinitions>
                   <ColumnDefinition Width="2*" />
                   <ColumnDefinition Width="*" />
               </Grid.ColumnDefinitions>
               <TextBlock FontWeight="Bold" />
               <TextBlock Grid.Column="1" HorizontalAlignment="Right" />
           </Grid>
       </DataTemplate>
   </ListBox.ItemTemplate>
</ListBox>
Hopefully, the code above doesn’t look as bad as it sounded earlier. The last thing we want to add on the left side is a place to give the total square footage of our list of rooms. We will need a label and text block as shown below to do this.
<Label Content="Total Square Feet:" Grid.Row="7" VerticalAlignment="Center" />
<TextBlock Name="TotalSquareFeet" Grid.Row="7" Grid.Column="1" VerticalAlignment="Center" />
The Right Side
On the right side of the Main Window things will be much less interesting. If you followed along in my simple tax calculator tutorial, this will look very familiar to you.
The first thing we want to on the right side is to get the price per square foot for the tile. We will need a label and a text box. Then we want a button the user can press to calculate the price. See the code below to see how to add these
<Label Content="Price Per Sq Ft:" Grid.Column="3" VerticalAlignment="Center" />
<TextBox Name="PricePerSqFoot" Grid.Column="4" VerticalAlignment="Center" Margin="10 0" />

<Button Name="CalculateButton" Content="Calculate Price" Grid.Row="1" Grid.Column="3" Grid.ColumnSpan="2" Margin="5" />
Now we want to add labels and text blocks to present the calculated data to the user. None of this is new so just check out the code below to see how we do this.
<Label Content="Waste Factor (10%):" Grid.Row="3" Grid.Column="3" VerticalAlignment="Top" />
<TextBlock Name="WasteFactor" Grid.Row="3" Grid.Column="4" VerticalAlignment="Top" HorizontalAlignment="Right" Margin="10 0" />

<Label Content="Total Material Required:" Grid.Row="4" Grid.Column="3" VerticalAlignment="Top" />
<TextBlock Name="TotalMaterial" Grid.Row="4" Grid.Column="4" VerticalAlignment="Top" HorizontalAlignment="Right" Margin="10 0" />

<Label Content="Total Material Cost:" Grid.Row="5" Grid.Column="3" VerticalAlignment="Top" />
<TextBlock Name="TotalMaterialCost" Grid.Row="5" Grid.Column="4" VerticalAlignment="Top" HorizontalAlignment="Right" Margin="10 0" />

<Label Content="Labor Cost:" Grid.Row="6" Grid.Column="3" VerticalAlignment="Top" />
<TextBlock Name="TotalLaborCost" Grid.Row="6" Grid.Column="4" VerticalAlignment="Top" HorizontalAlignment="Right" Margin="10 0" />

<Label Content="Total Cost:" Grid.Row="7" Grid.Column="3" VerticalAlignment="Center" FontWeight="Bold" />
<TextBlock Name="TotalCost" Grid.Row="7" Grid.Column="4"  VerticalAlignment="Center" HorizontalAlignment="Right" FontWeight="Bold" Margin="10 0" />
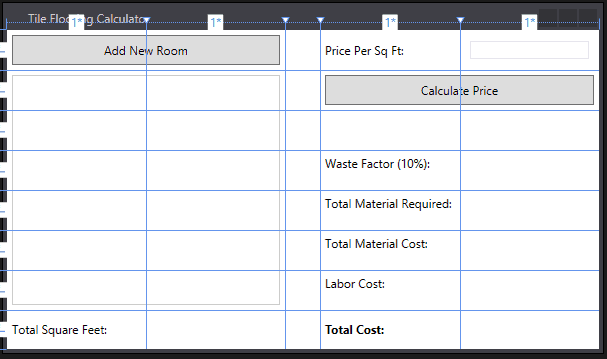
The UI for the Main Window is now complete and should look like the image below.
The Add New Room UI
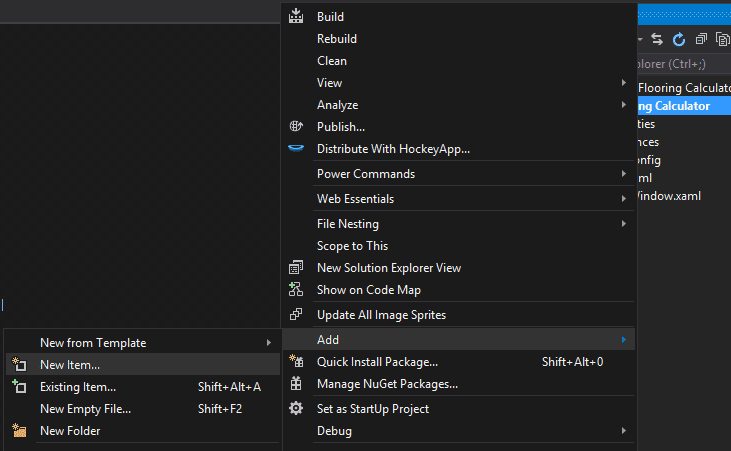
Now that the user interface is complete for the Main Window we want to start working on the UI for adding a new room. To do this, first, we need to add a new window to our project. To do this, we right-click on the project file in the solution explorer and click “New Item…” as shown below.
In the Add New Item window, you will choose “Window (WPF) and give it a name of “AddNewRoom.xaml.” Click Add.
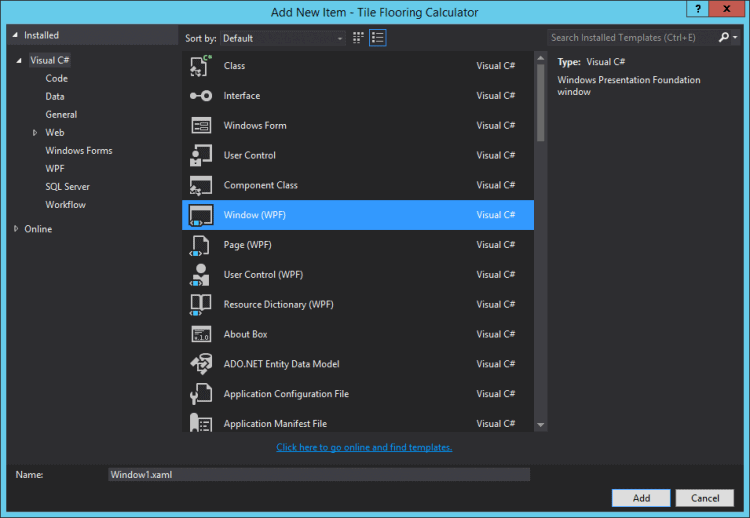
A new window “AddNewRoom” will be added to your solution. Now we can start laying out the elements to the newly created window. In solution explorer open “AddNewRoom.xaml”.
Set the Title to “Add New Room” and the height and width to 400.
The Grid
In this window, we want 3 columns and 7 rows. The second row will be 6 times larger than the others, and the last row will be 1.5 times larger. Do you remember how to do this? Try it out for yourself and then take a look at the code below to see how you did.
<Grid.ColumnDefinitions>
   <ColumnDefinition Width="*" />
   <ColumnDefinition Width="*" />
   <ColumnDefinition Width="*" />
</Grid.ColumnDefinitions>
<Grid.RowDefinitions>
   <RowDefinition Height="*" />
   <RowDefinition Height="6*" />
   <RowDefinition Height="*" />
   <RowDefinition Height="*" />
   <RowDefinition Height="*" />
   <RowDefinition Height="*" />
   <RowDefinition Height="1.5*" />
</Grid.RowDefinitions>
The Title
Now that we have a grid layout we will start adding elements starting with a title:
<Label Content="Rectangular Room" Grid.ColumnSpan="5" HorizontalAlignment="Center" FontSize="18" FontWeight="Bold" />
The Image
After the page title, we want to add a reference image to show a rectangle. I just threw something together in an image editing application (see image below). To add the image to the window, the image must first be in the project file. We can accomplish this by dragging the image from file explorer to the solution explorer.
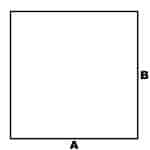
Once the image is added to the project in solution explorer we can add the image to the “Add New Room” window with the following line of code:
<Image Source="rectangle.jpg" Grid.Row="1" Grid.Column="0" Grid.ColumnSpan="3" HorizontalAlignment="Center" />
User Input
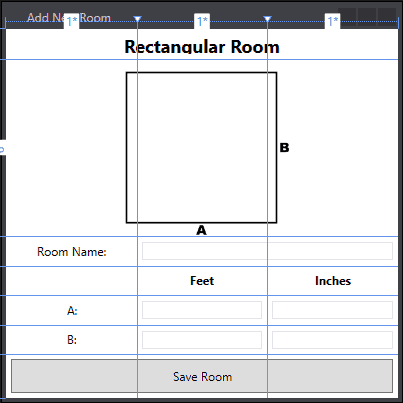
Once the image is in place, we want to add labels and text boxes to capture user input for feet and inches for each A and B. Then we want a button that spans across all 3 columns to save the room.
<Label Content="Room Name:" Grid.Row="2" HorizontalAlignment="Center" VerticalAlignment="Center" />
<TextBox Name="RoomName" Grid.Row="2" Grid.Column="1" Grid.ColumnSpan="2" Margin="5" VerticalAlignment="Center" />

<Label Content="Feet" Grid.Row="3" Grid.Column="1" HorizontalAlignment="Center" VerticalContentAlignment="Center" FontWeight="Bold" />
<Label Content="Inches" Grid.Row="3" Grid.Column="2" HorizontalAlignment="Center" VerticalContentAlignment="Center" FontWeight="Bold" />

<Label Content="A:" Grid.Row="4" HorizontalAlignment="Center" VerticalContentAlignment="Center" />
<TextBox Name="AFeetInput" Grid.Row="4" Grid.Column="1" VerticalAlignment="Center" Margin="5" />
<TextBox Name="AInchInput" Grid.Row="4" Grid.Column="2" VerticalAlignment="Center" Margin="5" />

<Label Content="B:" Grid.Row="5" HorizontalAlignment="Center" VerticalContentAlignment="Center" />
<TextBox Name="BFeetInput" Grid.Row="5" Grid.Column="1" VerticalAlignment="Center" Margin="5" />
<TextBox Name="BInchInput" Grid.Row="5" Grid.Column="2" VerticalAlignment="Center" Margin="5" />

<Button Name="SaveRoomButton" Content="Save Room" Grid.Row="6" Grid.ColumnSpan="3"  Margin="5" />
The UI for the Add New Room windows is now complete. The UI should look like below.
[thrive_leads id=’1035′]
The Code Behind
Now that the user interface is complete for both the Main Window and the Add New Room window its time to start working on the code behind for this application.
Room Class
We will start with the Main Window code behind which is located in the file “MainWindow.xaml.cs”. Here we will add a public class named “Room” that will hold all the fields needed with adding a new room. These properties include the title, width in inches, width in feet, height in inches, height in feet, and square feet of room. It will also include a method that will calculate the total square feet of the room. See the code below to see how we create this Room object inside the partial class MainWindow.
public class Room
{
   public string Title { get; set; }
   public decimal InchWidth { get; set; }
   public decimal FeetWidth { get; set; }
   public decimal InchHeight { get; set; }
   public decimal FeetHeight { get; set; }
   public decimal SqFeet { get; set; }

   public void CalculateTotalSqFeet()
   {
       decimal totalWidthInFeet = (InchWidth / 12) + FeetWidth;
       decimal totalHeightInFeet = (InchHeight / 12) + FeetHeight;
       SqFeet = (totalWidthInFeet * totalHeightInFeet);
   }
}
After the Room class, we want to create a list to hold our rooms that we create. We also want this list to trigger an update of the UI when the list changes. To do this, we want to create an ObservableCollection.
public static ObservableCollection<Room> Rooms = new ObservableCollection<Room>();
Add New Room Button Click
Next, we want to add a method to get called when the user clicks the “AddNewRoomButton.” To do this double click on the element in the designer for MainWindow.xaml. This will generate a method in the code behind that will be called when the user clicks the button.
Inside this new AddNewRoomButton_OnClick method, we want to add code that will display the Add New Room window. To do this, we will create an AddNewRoom object and call the Show() method on it. See below.
var addNewWindow = new AddNewRoom();
addNewWindow.Show();
Add New Room Code Behind
Now we are ready to get started on the code behind for the Add New Room window. Generate the OnClick method for the Save Room Button just like you did before. Open the “AddNewRoom.xaml.cs” file and observe there is a new method “SaveRoomButton_OnClick” method. Inside this method, we will call another method “ParseUserInput()” which we haven’t created yet and then call the close method for the window.
ParseUserInput();
this.Close();
Now let’s create the ParseUserInput method. Basically, all this method is going to do is Parse each of the 4 fields from the UI and assign them to a new Room object from the MainWindow class. Then we are going to add the room to the observable collection we created in the MainWindow.xaml.cs file.
private void ParseUserInput()
{
   MainWindow.Room room = new MainWindow.Room();

   decimal feetWidth;
   decimal inchWidth;
   decimal feetHeight;
   decimal inchHeight;

   Decimal.TryParse(AFeetInput.Text, out feetWidth);
   Decimal.TryParse(AInchInput.Text, out inchWidth);
   Decimal.TryParse(BFeetInput.Text, out feetHeight);
   Decimal.TryParse(BInchInput.Text, out inchHeight);

   room.Title = RoomName.Text;
   room.FeetWidth = feetWidth;
   room.InchWidth = inchWidth;
   room.FeetHeight = feetHeight;
   room.InchHeight = inchHeight;
   room.CalculateTotalSqFeet();

   MainWindow.Rooms.Add(room);
}
That’s it. That’s all we need to put in the “AddNewRoom.xaml.cs” file to get it to capture the room dimensions and add the new room to the list.
Main Window Code Behind
Now back to the “MainWindow.xaml.cs” file. Here we want to generate an OnClick method just like before. Then inside that method, we want to call “CalculateCost()” method which we haven’t created yet.
After this, we want to create the private method CalculateCost. Inside this method, we first want to parse the “PricePerSqFoot” text value from the UI and assign it to a variable to be used later. Then we want to iterate over each room in the observable collection “Rooms” and calculate the total square feet of all the rooms. See the code below to see how to do these two things.
decimal pricePerSqFt;
Decimal.TryParse(PricePerSqFoot.Text, out pricePerSqFt);
decimal totalSquareFeet = 0m;

foreach (var room in Rooms)
{
   totalSquareFeet += room.SqFeet;
}
After the above code, we want to calculate the waste factor which assumes 10 percent of the material will be wasted so that gets added to the total required material. Then we take the price per square foot and multiply it by the square feet of required material to get the total material cost. We are also going to assume that a flooring team can install 20 square feet of flooring per hour at the cost of $86 an hour. With this, we can calculate the total labor cost and then the total cost of the job.
After all of the calculations, we will want to assign the values to the text blocks in the UI. Check out the code below to see how all of this is done.
decimal wasteFactor = (totalSquareFeet * .1m);
decimal totalMaterial = totalSquareFeet + wasteFactor;
decimal totalMaterialCost = totalMaterial * pricePerSqFt;
decimal totalLaborCost = (totalMaterial / 20) * 86;
decimal totalCost = totalMaterialCost + ((totalMaterial / 20) * 86);

TotalSquareFeet.Text = String.Format($"{totalSquareFeet:N2} sq. feet");
WasteFactor.Text = String.Format($"{wasteFactor:N2} sq. feet");
TotalMaterial.Text = String.Format($"{totalMaterial:N2} sq. feet");
TotalMaterialCost.Text = String.Format($"{totalMaterialCost:C}");
TotalLaborCost.Text = String.Format($"{totalLaborCost:C}");
TotalCost.Text = String.Format($"{totalCost:C}");
The Finishing Touches
If you remember, at the beginning of the tutorial we created a listbox to hold our list of rooms when we add them to the observable collection. Now it’s time to go back and bind that listbox to the actual properties in the code behind. In the “MainWindow.xaml” file we created 2 textblock elements to hold the title and square feet of each room. In each of these elements we want to set the Text property to be bound to “Title” and “SqFeet.” We want the Square feet to be to 2 decimal places. See below.
<TextBlock Text="{Binding Title}" FontWeight="Bold" />
<TextBlock Text="{Binding SqFeet, StringFormat=N2}" Grid.Column="1" HorizontalAlignment="Right" />
We also need to add the following to the MainWindow method in the MainWindow.xaml.cs file. This links the list box to the Rooms list.
RoomsListBox.ItemsSource = Rooms;
That’s it! Now let’s check the application out.
See it in Action
Now when we run the application, we will see that we can click the Add New Room button to add to the list of rooms. When we click the Calculate Price button, we see that the total cost and how we arrived at the total cost is displayed.
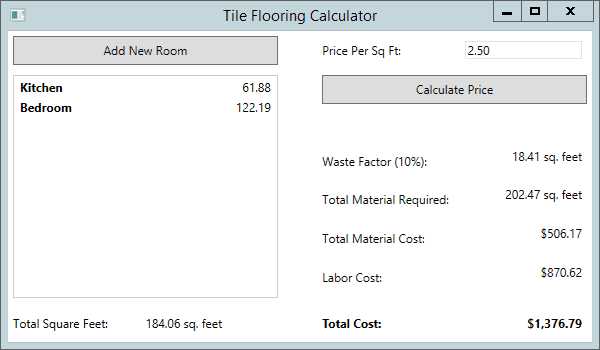
Congratulations! You now have a working tile flooring calculator that you built yourself using WPF and C#. You also know how to create simple applications with multiple windows and know how to open and close separate windows from within your application.
Remember I am documenting my journey of learning C# by writing these tutorials, so if you see a mistake or know a better way of doing something I have shown here, please let me and others know in the comments below.
[thrive_leads id=’1035′]
